
This entry was posted on Feb 25, 2025 by Charlotte Bell.

If I were to rate yoga’s asanas in terms of how complicated they are, Revolved Triangle Pose (Parvrtta Trikonasana) would hover around the top. Revolved Triangle is a standing pose, a balancing pose, a spinal rotation, a leg stretch and a breathing challenge. Whew!
Of course, the plethora of elements that make up the pose also provide unique benefits. Here are some of the ways Parvrtta Trikonasana can increase your physical and mental wellbeing:
- Strengthens feet, ankles legs, hips and abdominals.
- Improves flexibility in the spine, hamstrings, shoulders and upper back.
- Twists improve mobility in the thoracic spine, a part of the spine that can sometimes become less mobile over time.
- Revolved Triangle Pose challenges balance and improves core stability for better balance.
- Increased mobility in the thoracic spine and rib cage facilitates deeper breathing.
- Revolved Triangle requires concentration and therefore, helps build concentration.
Parvrtta Trikonasana Elements and Cautions
Because Revolved Triangle Pose is both challenging and complicated, it’s helpful to prepare your body by practicing all the elements of the pose separately. So what do I mean by the “elements” of the pose? The elements of the pose are all the various movements and challenges in the body that make up the pose. When we break a pose down into its constituent components, we can practice each one separately, in a less challenging format so that the body is more prepared to put them all together in Parvrtta Trikonasana. Here are the basic components:
- Standing
- Balancing
- Calf, hamstring, hip stretching
- Spinal rotation
Like every yoga pose, Revolved Triangle Pose carries with it cautions. It’s not always appropriate for everyone. Here are a few situations when you might want to approach the pose with care or skip it altogether:
- Injured or compromised neck
- Injury to the hamstrings
- Sacroiliac issues (Any spinal rotation can be hard on the SI joint.)
- Pregnancy (Twists of any kind are contraindicated in the first trimester. After the first trimester, once the abdomen begins to expand, this pose becomes really difficult.)
A Sequence to Prepare for Revolved Triangle Pose
Here’s a short sequence to prepare your body for Revolved Triangle.
- Easy Pose (Sukhasana): Take a few minutes to settle your body/mind in Sukhasana. Revolved Triangle Pose requires concentration, so be sure to keep your mind in your body throughout this sequence.
- Revolved Easy Pose (Parvrtta Sukhasana): This pose introduces a gentle spinal rotation. Practicing Revolved Easy Pose with a long, upright spine reminds us how our spine should feel in Revolved Triangle.
- Mountain Pose (Tadasana): Tadasana helps us establish balance and collect our minds. The next six standing poses emphasize balance, leg strength, flexibility and finally, spinal rotation.
- Wide-Legged Standing Forward Bend (Prasarita Padottanasana): This is a great warmup for stretching the hamstrings.
- Warrior II Pose (Virabhadrasana II): Warrior II warms up the entire body—especially the legs, hips and core.
- Side Angle Pose (Parsvakonasana): Parsvakonasana adds a side-body stretch to Warrior II.
- Triangle Pose (Trikonasana): Triangle Pose stretches the hamstrings, and promotes lengthening in the spine.
- Warrior I Pose (Virabhadrasana I): Warrior I orients the feet, legs and pelvis to what will be the foundation for Revolved Triangle Pose.
- Revolved Side Angle Pose (Parvrtta Parsvakonasana): This pose is just as complicated as Revolved Triangle, but without the added challenge of hamstring stretching.
- From here you can move on to Upright Revolved Triangle Pose.
Begin with Upright Parvrtta Trikonasana
I love this variation for preparing for Revolved Triangle. Because you don’t bend forward in this variation, you can really focus on the rotation. It’s far easier to create the rotation first and then move into the forward bend than it is to try to rotate your torso when you’re already bending forward.
- Place a nonskid yoga mat parallel to a wall.
- Stand with your feet hips-width apart at the front end of your mat with your right side facing the wall.
- Step your left foot straight back 2-3 feet, keeping your feet hips-width apart from side to side, and pointing your left foot mostly forward. It will need to angle outward slightly.
- Plant your left foot. Then begin internally rotating the left leg (toward the wall). Begin at the ankle, then rotate the shin, knee, thighbone, pelvis, and finally, the ribcage. Place your hands on the wall at chest level to facilitate the twist.
- Keep your head in a neutral position, so that you’re looking at the wall.
- Stay upright and breathe into the twist, lengthening your spine as you ground the feet.
- Stay for 5 to 10 deep breaths.
- Rotate your torso back to the center.
- Step your left foot forward and stand in Tadasana, checking in with what you feel. How did the twist change you?
- Now walk to the other end of your mat and stand in Tadasana with your left side facing the wall and repeat the pose.
Full On Parvrtta Trikonasana
- Repeat steps 1 through 7, but this time, place a yoga block so that it’s standing on end between your feet before you start. If you find later on that you can lower the block to one of its shorter levels without compromising the length of your torso and your ability to breathe easily, feel free to do this.
- After you’ve done steps 1 through 7, ground your feet and extend left arm out in front of you, extending the entire torso, head to tail, along with it.
- Keep extending outward as you lower your left hand and place it on your block.
- Place your right hand at the wall to stabilize your balance and to facilitate the spinal rotation. Extend your pelvic floor back, away from the head.
- Draw the hip of the right leg back.
- Take 5 to 10 deep breaths here.
- Lift your torso up, unwind the rotation of your ribcage, and step your left leg forward.
- Stand in Tadasana for a moment to check in with how you feel after the pose.
- Repeat on the other side.
Practicing these two poses before trying this in the middle of the room helps prepare your body and teach you a step-by-step method for moving into the pose, without having to worry about your balance.
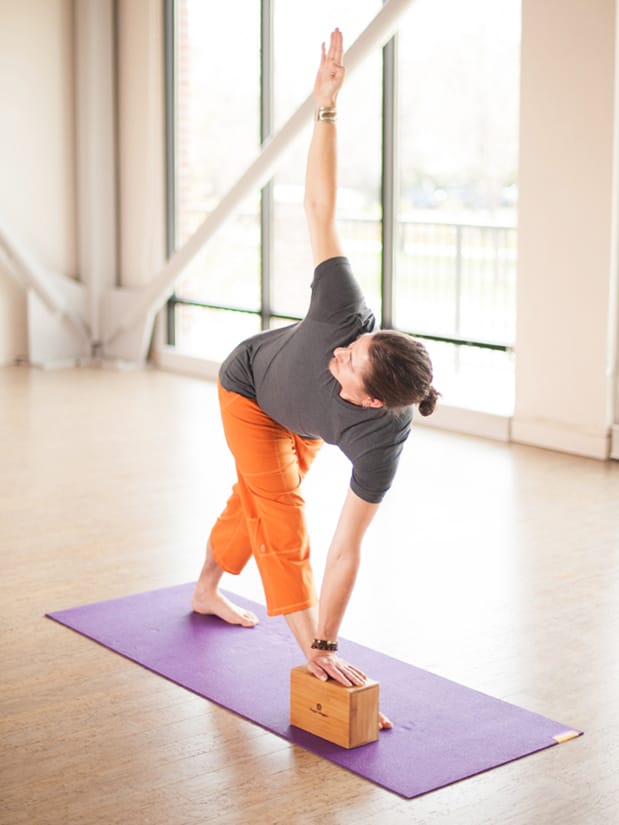
If you want to try practicing in the center of the room, follow the same steps as above, except, of course, eliminating those that depend on the wall. If your breathing feels relaxed and your torso is long, you can try another variation. Place your block on the outside of your foot as in the above photo.
How to Decompress
Decompressing after Revolved Triangle Pose is just as important as sound preparation. After one or more Revolved Triangles, give your body a chance to cool off before a nice, long Savasana. Your hamstrings and hips will be ready for some nice, relaxing forward bends, so feel free to linger in these poses. These are just my suggestions. Any of your favorite forward bends will do.
About Charlotte Bell
Charlotte Bell discovered yoga in 1982 and began teaching in 1986. Charlotte is the author of Mindful Yoga, Mindful Life: A Guide for Everyday Practice and Yoga for Meditators, both published by Rodmell Press. Her third book is titled Hip-Healthy Asana: The Yoga Practitioner’s Guide to Protecting the Hips and Avoiding SI Joint Pain (Shambhala Publications). She writes a monthly column for CATALYST Magazine and serves as editor for Yoga U Online. Charlotte is a founding board member for GreenTREE Yoga, a non-profit that brings yoga to underserved populations. A lifelong musician, Charlotte plays oboe and English horn in the Salt Lake Symphony and folk sextet Red Rock Rondo, whose DVD won two Emmy awards.